Last year about this time, I purchased a cheapo woodburning set and some little wood pieces and tried my hand at woodburning. I made a few ornaments (crude as they were) for my friends and neighbors who we share pet care with from time to time.
Fast forward to about Nov. 1st (just last month) - I was experimenting with that primitive woodburner (we're talking the $25.00 special) and it just wasn't doing what I wanted it to do, so I indulged and purchased a better woodburner set from Amazon.
Lo and behold, it was exactly what I needed to pursue more pyrography - with lots of tips and two handles - a way to regulate the heat and an easier way to attack burning an image.
I had several cradled basswood panels for 'painting' - the perfect surface for woodburning!
Having lots of fun and exploring ways to make different 'burn' marks on wood
AND on watercolor paper! Here are my attempts - in order...
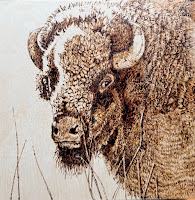
Actually, this piece was started with the OLD woodburner - and while doing it, I decided to
upgrade to a better and more extensive woodburning set-up.
The surface I used is veneered cabinet wood plucked from a cabinet makers dumpster,
in a small town in Kansas on a Sunday afternoon (we are talking YEARS AGO)
on my way home from teaching a class. Word was,
one could go by with permission and gather scraps of this great veneered wood -
I was in the area and figured, why not? DH cut down the pieces into manageable,
paintable sizes - and I have been enjoying the advantage - ever-since.
Smokes terribly and underneath the surface is some kind of glue that smokes,
quickly grabbed the facemask. The color was done by using watercolor,
colored pencils and pastel pencils.
or it can be hung on the wall. I loved the surface as it sort of lends itself to helping to
create the feel of FUR as it burns into the woodgrain. I entered it in a small artworks sale at the gallery and it has been SOLD!
Look back one post and see this same image done in colored pencil.
I ordered some more wood plaques/like tree trunk wood and tried this little guy.
It was suggested that one uses sandpaper to smooth the surface on these - and I truly DO that
as it has lots of ridges to maneuver with those growth rings and cut marks.
The white accent is done in colored pencil and Posca pen.
(I think I will feel a 'learning curve' on this artform for a long time.}
I am finding it takes an 'uber' amount of time and 'there is no room for mistakes'.
I had read that one could BURN into watercolor paper, so I got out
a piece of Fluid 100, it has a weight of 300 lbs. - thicker with some stiffness.
I used a photo reference, permission from James Burton, in a FB group I belong to.
"Succulent Sunshine" is 8" x 10" and I love the way
the paper handled the woodburning tools.
I enhanced the shadowed areas with some
Sepia colored watercolor.
Definitely going to explore more of this 'way to burn'.
"Highland Coo" 8" x 8" love the look of these bovid mammals.
Again, I burned into cradled basswood..so smooth, no need to
use sandpaper on the surface pre-burn. I painted the non-burned outer
area with coffee. I need to add a couple more layers of coffee to get
the effect I wanted, but later on I worked that same area with some Sepia colored
watercolor wash. I like the effect.
Honestly, I have too many LOVES in my studio. I have a hard time
staying with ONE medium - one way to express - experimentation
is what it's about. Am I looking for that ONE thing that I can stay with
forever - nope. Never have, never will.
Copyright © 2024 Dust Off the Butterfly and Pattie Wall/All Rights Reserved


No comments:
Post a Comment